

Today I am going to talk to you about a material with which we can make very original and really beautiful crafts: wool. It is one of the great inventions that Mother Nature has given us, this type of fiber has been with us since the Neolithic and few things in history have taken advantage of and used the human being.

But with it we can also do a large number of crafts. They can be very varied, in a multitude of shades, of any size and for any type of person and age. In this case, I will explain how to create one that I especially love: Mandalas.
Before starting to explain how to make a wool mandala, tell you that you have a great variety, both in tones and colors and in the different types of fiber. I buy them at Las Tijeras Mágicas, which have a large number of articles related to the world of wool; I leave you the link of his website lastijerasmagicas.com
How to make a wool mandala …
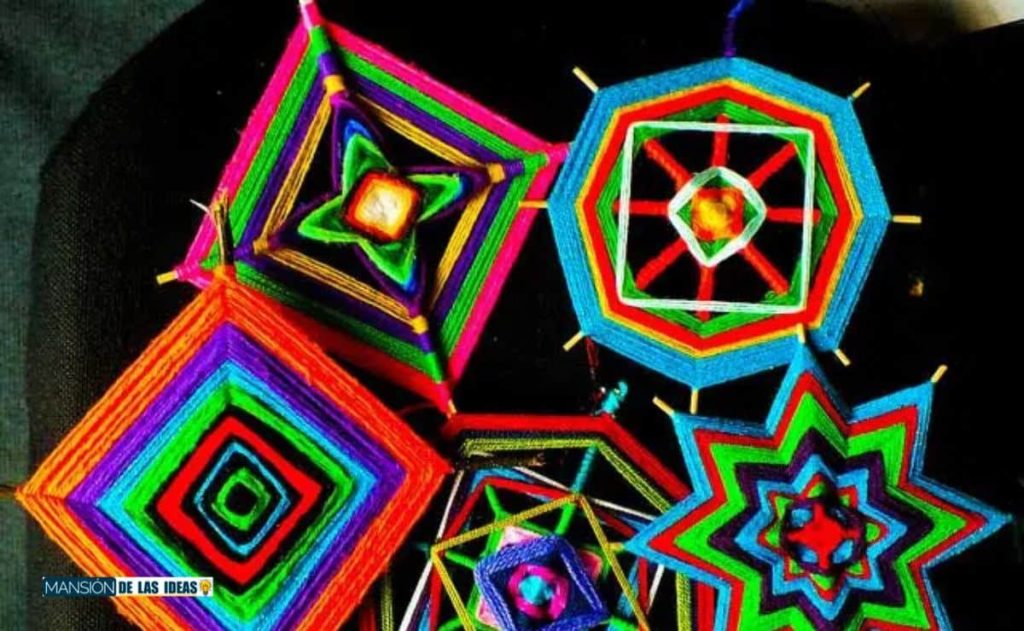
There are many models: Eye of God, Fire Rooster, Star or also called eight-pointed, Spiral type … And with them you can create objects such as Dreamcatchers, lamps, mobiles for baby rooms, coasters, under plates and a multitude of other items. . I have chosen the Eye of God for the large number of ways that can be achieved with this mandala. The materials you will need are: 4 skewer sticks, cloth (optional), glue and scissors. If you need any of these materials, you can get them at https://merceriasarabia.com/
Step 1. The first thing we must do is tie two of the skewer sticks together and then turn them, obtaining an angle of 90 degrees. We start using the yarn by going one round diagonally and then another, but this time in the reverse diagonal.
Step 2. Let’s go with the square point. We will achieve this by giving one of the sticks one full turn, using the other skewer stick we give another turn with the wool, and so on. It is important to note that if we start the lap from the front, we will always do the laps from the front. If we say to do it from behind, it will be done in the same way.
Step 3. We make several turns until we get a rhombus, we make a knot and cut the wool.
Step 4. We create another Eye of God just like the one we just made and mount one on top of the other using a drop of glue. It is ideal that one of the rhombuses is larger than the other so that, when we assemble them, part of the one below can be seen.
Step 5. We begin to make the Star Point. The way to achieve this is to tie the wool in the back God’s Eye, skip two of the sticks and make a complete turn to the third. We follow this dynamic: jump two and link with the third; I jump two and link back to the third … We continue making another Star Point but in this case with wool of another color.
Step 6. If we look at it, the back of the mandala that we have created is strange and not uniform due to the wool. To “save this small defect”, we repeat the star points but now on this side. When we have finished, we then make a square stitch on this side with wool of a different color.
Step 7. To continue creating our wool mandala, we continue to make variations of these two points and with different colors of wool, in such a way that the figures contrast with each other. We can also join the sticks with yarns of different colors by crossing and interlacing some sticks with others. In this way we will get a great variety in colors and shapes for our mandala.
Step 8. We finish by cutting, cut the sticks to the same size and join their ends by interlacing a piece of wool creating horizontal and vertical lines that will give it a different and very original finish. So that the tips of the sticks are not seen, we can wrap each one with a little wool.
And we will have our mandala finished! The final result will surely surprise you. You will like it so much that I am convinced that it will be part of your personal collection of crafts.
A big hug and see you in my next post.
[table id=”69″ /]